如何在CentOS上安装PHP7版的LEMP环境?

本文适用于CentOS7/CentOS6全新搭建LEMP(Linux+Nginx+MySQL+PHP7)环境,需要注意地是:
- Nginx并不能像
Apache mod_rewrite那样支持.htaccess文件做URL Rewrite,项目需要Rewrite的同学请注意:如果你没有或不能将Apache的Rewrite Rule转换成Nginx的,请慎用! - 由于我们安装的是
php7-fpm,运行环境为PHP7,所以你还要考虑你的项目是否支持PHP7?需要PHP5的LEMP环境的请点击如何在CentOS7上安装LEMP环境?
PHP7的LEMP环境安装方式和上文链接中的默认LEMP环境的搭建事实上很相似,只是由于CentOS默认源的软件版本都比较低的,所以我们安装PHP-FPM前需要更新一下PHP7-FPM的RPM源。
需要配置虚拟主机的朋友请移步:Nginx如何配置虚拟主机?
老步骤,没有没有安装EPEL的,先安装EPEL:
yum -y install epel-release
安装Nginx
yum -y install nginx
开机自启动
systemctl enable nginx
启动Nginx服务
systemctl start nginx
设置防火墙规则
firewall-cmd --permanent --zone=public --add-service=http
firewall-cmd --permanent --zone=public --add-service=https
firewall-cmd --reload
这时候访问http://yourIpAddress,应该能看到这样的页面:
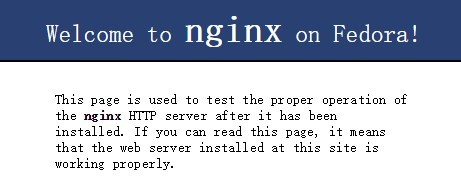
如果看到说明Nginx安装成功,否则请检查重新安装。
安装MariaDB数据库
yum -y install mariadb-server mariadb
设置开机自启动
systemctl enable mariadb
启动MariaDB
systemctl start mariadb
初始化及设置root密码
mysql_secure_installation
[root@localhost ~]# mysql_secure_installation

NOTE: RUNNING ALL PARTS OF THIS SCRIPT IS RECOMMENDED FOR ALL MariaDB SERVERS IN PRODUCTION USE!  PLEASE READ EACH STEP CAREFULLY!

In order to log into MariaDB to secure it, we'll need the current password for the root user.  If you've just installed MariaDB, and you haven't set the root password yet, the password will be blank,so you should just press enter here.

Enter current password for root (enter for none):   ##回车
OK, successfully used password, moving on...

Setting the root password ensures that nobody can log into the MariaDB root user without the proper authorisation.

Set root password? [Y/n]    ##回车
New password:    #root的密码
Re-enter new password:    #重复密码
Password updated successfully!
Reloading privilege tables..
 ... Success!


By default, a MariaDB installation has an anonymous user, allowing anyone to log into MariaDB without having to have a user account created for them.  This is intended only for testing, and to make the installation go a bit smoother.  You should remove them before moving into a production environment.

Remove anonymous users? [Y/n] ##回车
 ... Success!

Normally, root should only be allowed to connect from 'localhost'.  This ensures that someone cannot guess at the root password from the network.

Disallow root login remotely? [Y/n] ##回车
 ... Success!

By default, MariaDB comes with a database named 'test' that anyone can access.  This is also intended only for testing, and should be removed before moving into a production environment.

Remove test database and access to it? [Y/n] ##回车
 - Dropping test database...
 ... Success!
 - Removing privileges on test database...
 ... Success!

Reloading the privilege tables will ensure that all changes made so far will take effect immediately.

Reload privilege tables now? [Y/n] ##回车
 ... Success!

Cleaning up...

All done!  If you've completed all of the above steps, your MariaDB installation should now be secure.

Thanks for using MariaDB!
MariaDB已经成功安装!
更新PHP7的RPM源
CentOS/RHEL 7.x:
rpm -Uvh https://dl.fedoraproject.org/pub/epel/epel-release-latest-7.noarch.rpm
rpm -Uvh https://mirror.webtatic.com/yum/el7/webtatic-release.rpm
CentOS/RHEL 6.x:
rpm -Uvh https://dl.fedoraproject.org/pub/epel/epel-release-latest-6.noarch.rpm
rpm -Uvh https://mirror.webtatic.com/yum/el6/latest.rpm
安装PHP7-FPM
yum -y install php70w-fpm php70w-opcache
关于php70w-opcache,在《如何在CentOS7上升级PHP5.x到PHP7?》一文中我们已经简单有了解过:是php自身开启性能加速的一个模块,我还是建议安装上的!
安装php7常用模块
yum -y install php70w-mysql php70w-xml php70w-soap php70w-xmlrpc php70w-mbstring php70w-json php70w-gd php70w-mcrypt
配置cgi.fix_pathinfo
vi /etc/php.ini
搜索cgi.fix_pathinfo,找到
;cgi.fix_pathinfo=1
将这一行改成
cgi.fix_pathinfo=0
保存并退出
配置PHP7-FPM
修改php-fpm的conf配置文件
vi /etc/php-fpm.d/www.conf
找到
user = apache
group = apche
修改为:
user = nginx
group = nginx
保存并退出
设置php-fpm开机自启动
systemctl enable php-fpm
开启php-fpm
systemctl start php-fpm
建立站点并测试
高阶操作 -> Nginx如何配置虚拟主机?
建立站点配置文件
vi /etc/nginx/conf.d/default.conf
server {
    listen 80;
    root /var/www/html/; ##站点目录
    index index.php index.html index.htm;  #索引文件

    server_name 127.0.0.1;  ##设置域名

    location / {
        try_files $uri $uri/ /index.html;
    }

    error_page 404 /404.html;  ##错误页
    error_page 500 502 503 504 /50x.html;
    location = /50x.html {
        root /var/www/html/;
    }

    location ~ \.php$ {
        fastcgi_split_path_info ^(.+\.php)(/.+)$;
        fastcgi_pass 127.0.0.1:9000;
        fastcgi_index index.php;
        fastcgi_param SCRIPT_FILENAME $document_root$fastcgi_script_name;
        include fastcgi_params;
    }

}
保存后使用 /usr/sbin/nginx -t 检测配置文件
nginx: the configuration file /etc/nginx/nginx.conf syntax is ok
nginx: configuration file /etc/nginx/nginx.conf test is successful
如果提示和上面一样,重启nginx
systemctl restart nginx
在站点目录中建立文件
由于我们在默认站点配置文件中把目录设置在/var/www/html/了,所以我们需要先建立目录:
mkdir -p /var/www/html
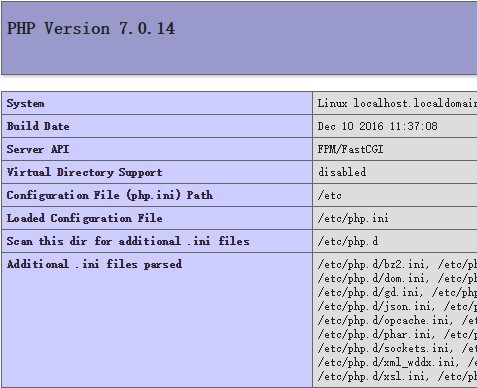
然后创建phpinfo的文件
vi /var/www/html/info.php
输入
<?php
phpinfo();
?>
保存退出,这时候我们访问 http://YourIPAddress/info.php,如果不出意外的话你看到的应该是这样的页面