使用Fastify创建RESTFul API并配置Swagger UI跨域和Apikey认证
Express版的请移步这里。
安装Fastify
github项目地址:https://github.com/fastify/fastify
创建项目目录
mkdir api-service
cd api-service
初始化fastify项目
npm init fastify
开始安装
npm i
安装完成后可使用开发模式
npm run dev
或生产模式
npm start
来运行fastify。
Fastify 默认端口、环境变量和命令参数
默认情况下,Fastify在端口3000上监听主机127.0.0.1。您可以通过在.env文件中声明的环境变量来更改这些设置(例如)
FASTIFY_PORT=3001
FASTIFY_ADDRESS=127.0.0.2
或者修改package.json文件scripts参数
    "start": "fastify start -l info app.js -p 3006",
    "dev": "fastify start -w -l info -P app.js -p 3006 -a 127.0.0.2",
FASTIFY_PORT (-p) 要监听的端口(默认为 3000)FASTIFY_ADDRESS (-a) 要监听的地址(默认为 localhost)
您可以在这里找到 Fastify 环境变量和命令行参数的完整列表:https://www.npmjs.com/package/fastify-cli
跨域请求管理
出于安全考虑,我们需要简单方便的管理API跨域请求,这时候我们需要安装和配置Fastify CORS。
在项目根目录下运行
npm i @fastify/cors
然后找到app.js注册该模块
  fastify.register(require('@fastify/cors'), {
      // put your options here
    origin: ['http://localhost:8080', 'http://127.0.0.1:3006', 'http://localhost:3000'],
    methods: ['GET', 'PUT', 'PATCH', 'POST', 'DELETE']
}) origin配置授权请求的域名,methods为请求的方法
安装和配置Swagger和Swagger-UI
npm i @fastify/swagger
npm i @fastify/swagger-ui
注册
  fastify.register(require('@fastify/swagger'), {
    swagger: {
      info: {
        title: 'Test swagger',
        description: 'Testing the Fastify swagger API',
        version: '0.1.0'
      },
      externalDocs: {
        url: 'https://swagger.io',
        description: 'Find more info here'
      },
      host: '127.0.0.1:3000',
      schemes: ['http', 'https'],
      consumes: ['application/json'],
      produces: ['application/json'],
      tags: [
        { name: 'user', description: 'User related end-points' },
        { name: 'code', description: 'Code related end-points' }
      ],
      definitions: {
        User: {
          type: 'object',
          required: ['id', 'email'],
          properties: {
            id: { type: 'string', format: 'uuid' },
            firstName: { type: 'string' },
            lastName: { type: 'string' },
            email: {type: 'string', format: 'email' }
          }
        }
      },
      securityDefinitions: {
        apiKey: {
          type: 'apiKey',
          name: 'apiKey',
          in: 'header'
        }
      }
    }
  })


  fastify.register(require('@fastify/swagger-ui'), {
    routePrefix: '/docs',
    uiConfig: {
      docExpansion: 'full',
      deepLinking: false
    },
    uiHooks: {
      onRequest: function (request, reply, next) { next() },
      preHandler: function (request, reply, next) { next() }
    },
    staticCSP: true,
    transformStaticCSP: (header) => header,
    transformSpecification: (swaggerObject, request, reply) => { return swaggerObject },
    transformSpecificationClone: true
  })
最后在路由目录routes下新建一个文件/users/index.js
'use strict'
module.exports = async function(fastify, opts) {
    fastify.route({
        url: '/info/:id/',
        method: ['GET'],
        // request and response schema
        schema: {
            summary: 'Get user\'s Data',
            description: 'Returns a given user\'s data',
            tags: ['User'],
            // (or query) validates the querystring
            params: {
                type: 'object',
                properties: {
                    id: {
                        type: 'number',
                        description: 'a User id'
                    }
                }
            },
            // the response needs to be an object with an `hello` property of type 'string'
            response: {
                200: {
                    description: 'Returns User model',
                    type: 'object',
                    properties: {
                        id: {
                            type: 'number',
                            format: 'uuid'
                        },
                        firstName: {
                            type: 'string'
                        },
                        lastName: {
                            type: 'string'
                        },
                        email: {
                            type: 'string',
                            format: 'email'
                        }
                    }
                },
                404: {
                    description: 'User not found',
                    type: 'object',
                    properties: {
                        code: {
                            type: 'string'
                        },
                        message: {
                            type: 'string'
                        }
                    }
                }
            }
        },
        // called just before the request handler
        preHandler: async (request, reply) => {
            const {
                id
            } = request.params
            if (id <= 0) {
                reply.code(404).send({
                    code: 'USER_NOT_FOUND',
                    message: `The user #${id} not found!`
                })
                return null
            }
        },
        // the function that will handle this request
        handler: async (request, reply) => {
            return request.params
        }
    })

    fastify.route({
        url: '/info/',
        method: ['GET'],
        // request and response schema
        schema: {
            summary: 'Get users\' Data',
            description: 'Returns all users\'s data',
            tags: ['User'],
            // (or query) validates the querystring
            params: {
            },
            // the response needs to be an object with an `hello` property of type 'string'
            response: {
                200: {
                    description: 'Returns User model',
                    type: 'object',
                    properties: {
                        id: {
                            type: 'number',
                            format: 'uuid'
                        },
                        firstName: {
                            type: 'string'
                        },
                        lastName: {
                            type: 'string'
                        },
                        email: {
                            type: 'string',
                            format: 'email'
                        }
                    }
                },
                404: {
                    description: 'User not found',
                    type: 'object',
                    properties: {
                        code: {
                            type: 'string'
                        },
                        message: {
                            type: 'string'
                        }
                    }
                }
            }
        },
        // called just before the request handler
        preHandler: async (request, reply) => {
            return null
        },
        // the function that will handle this request
        handler: async (request, reply) => {
            return 'hello all'
        }
    })

    fastify.route({
        url: '/info/',
        method: ['POST'],
        // request and response schema
        schema: {
            summary: 'Get users\' Data',
            description: 'Returns all users\'s data',
            tags: ['User'],
            // (or query) validates the querystring

            body: {
                type: 'object',
                properties: {
                    id: {
                        type: 'number',
                        description: 'a User id'
                    },
                    name: {
                        type: 'string'
                    },
                    email: {
                        type: 'string',
                        format: 'email'
                    }
                }
            },
            // the response needs to be an object with an `hello` property of type 'string'
            response: {
                200: {
                    description: 'Returns User model',
                    type: 'object',
                    properties: {
                        id: {
                            type: 'number',
                            format: 'uuid'
                        },
                        name: {
                            type: 'string'
                        },
                        email: {
                            type: 'string',
                            format: 'email'
                        }
                    }
                },
                404: {
                    description: 'User not found',
                    type: 'object',
                    properties: {
                        code: {
                            type: 'string'
                        },
                        message: {
                            type: 'string'
                        }
                    }
                }
            }
        },
        // called just before the request handler
        preHandler: async (request, reply, next) => {
          if (request.body) {
            request.log.info({ body: request.body }, 'parsed body')
          }
          next()
        },
        // the function that will handle this request
        handler: async (request, reply) => {
            console.log(request.body)
            //reply.send(request.rawBody)
            return request.body.name
        }
    })
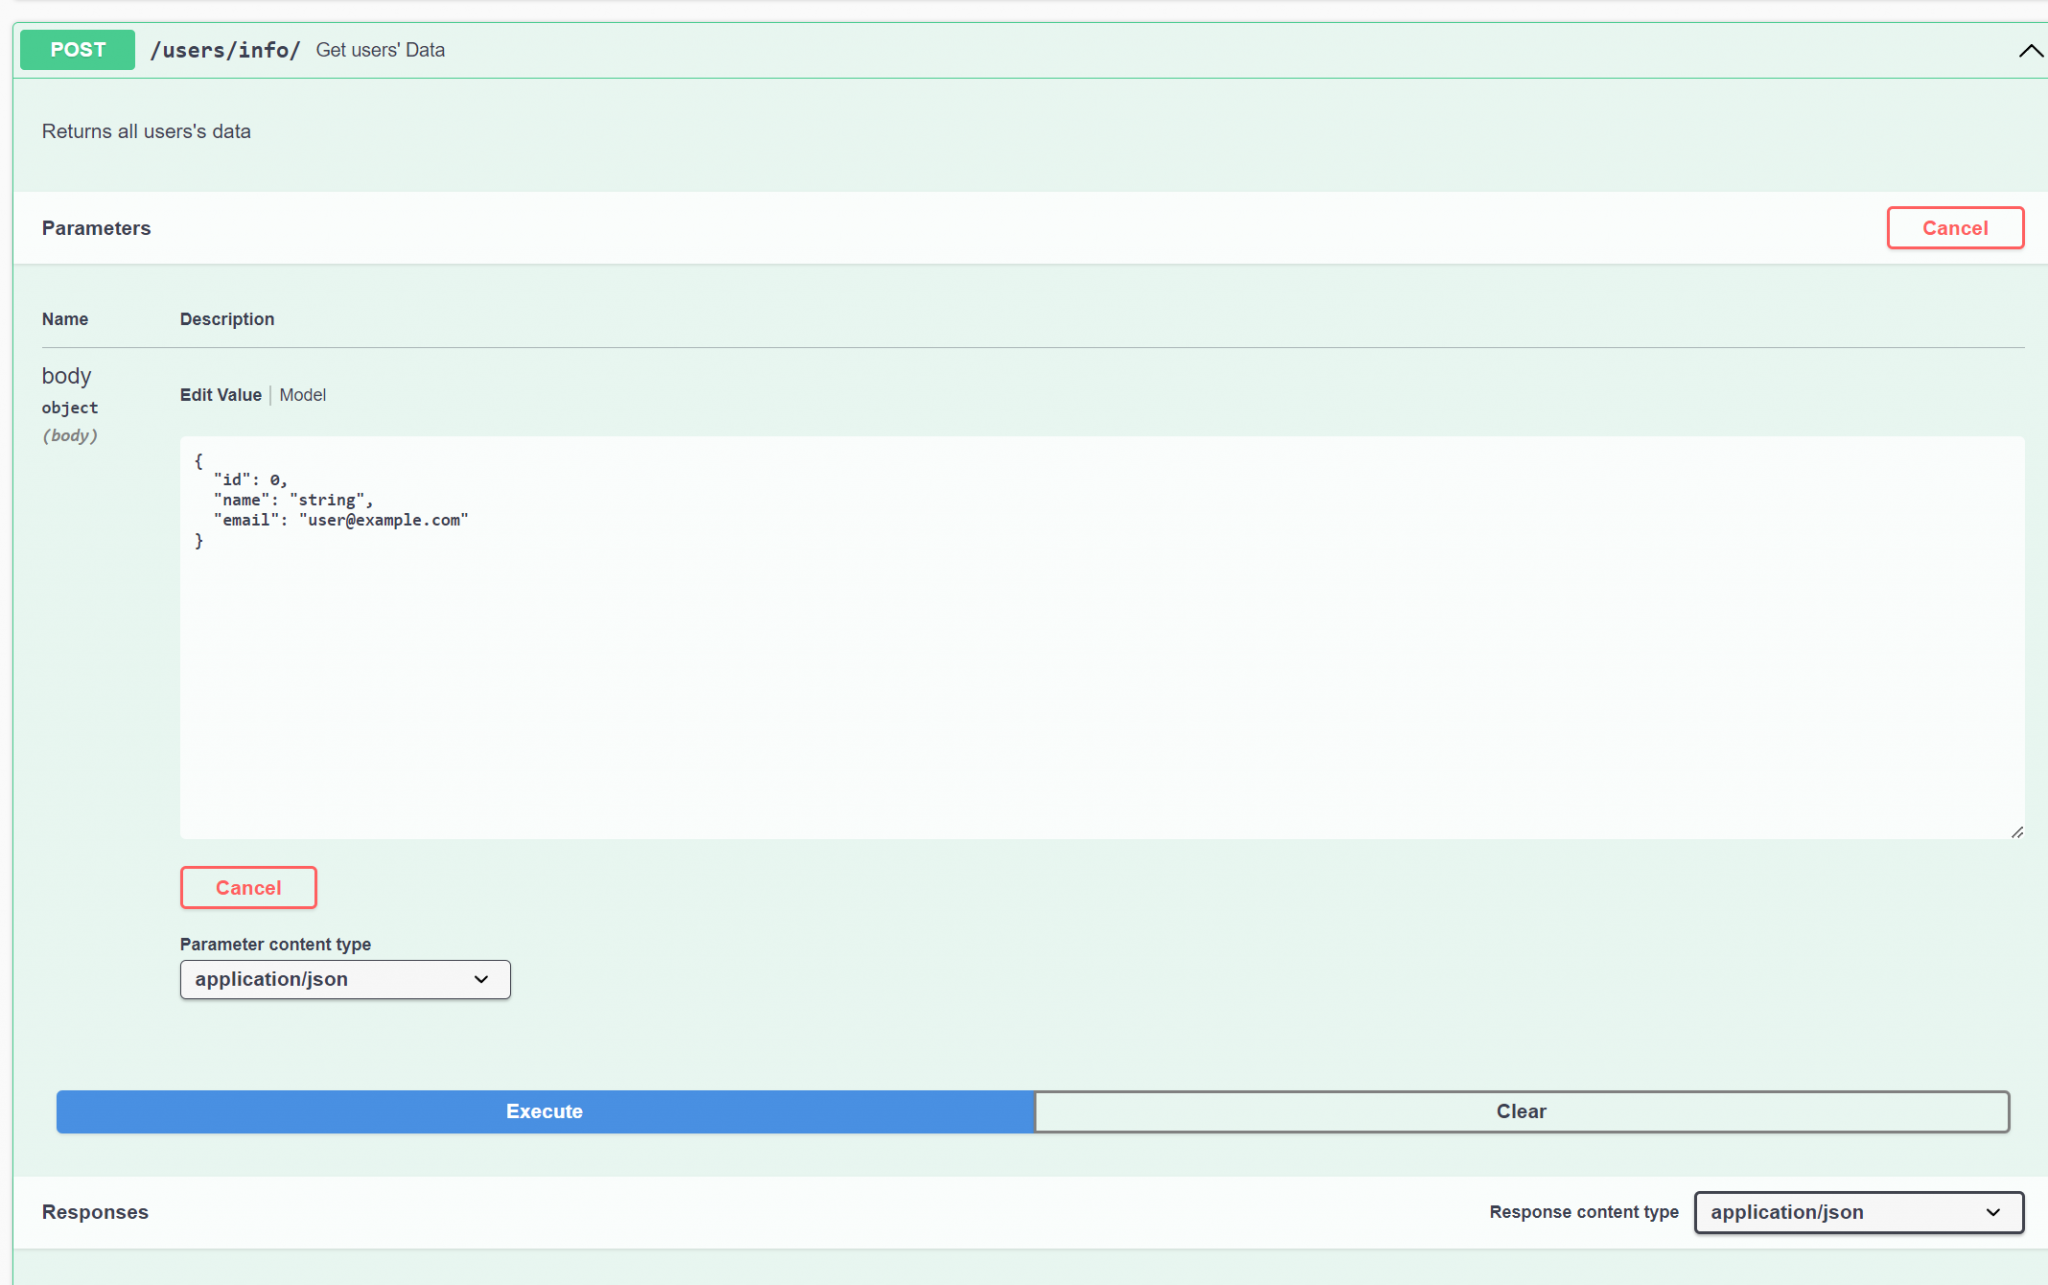
}最后使用yarn dev启动项目并访问http://127.0.0.1:3000/docs/,注意文档地址可以在上面routePrefix中修改。
使用Apikey请求授权认证
创建.env文件,并添加APIKEY设置
APIKEY=****************
在路由对应的请求中找到schema,并添加
security: [
              {
                "apiKey": []
              }
] 继续在下面的response中添加一个401认证错误的状态
401: {
                  description: 'User not authorized',
                  type: 'object',
                  properties: {
                    code: { type: 'string' },
                    message: { type: 'string' }
                  }
} 找到preHandler: async (request, reply) => {}添加apikey验证
            if (request.headers.apikey !== process.env.APIKEY) {
              reply.code(401).send({
                code: 'UNAUTHORIZED',
                message: `Wrong API key or missing`
              })
              return null
            }
在添加完以上设置会看到以下效果,右上角多一把锁形图标

这时候如果产生请求会得到一个401错误
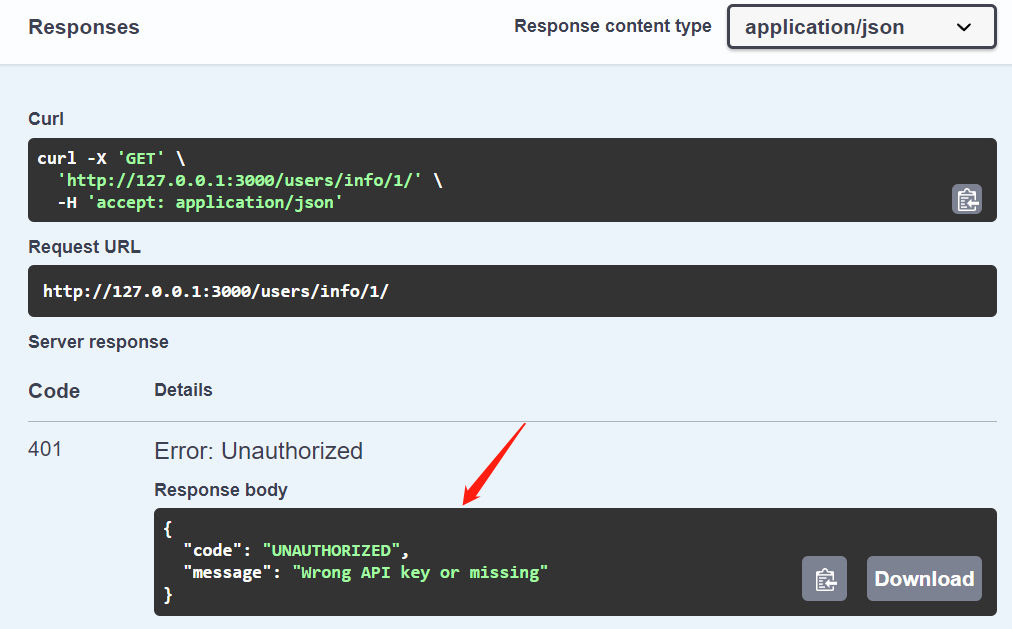
点击图标进行apikey认证
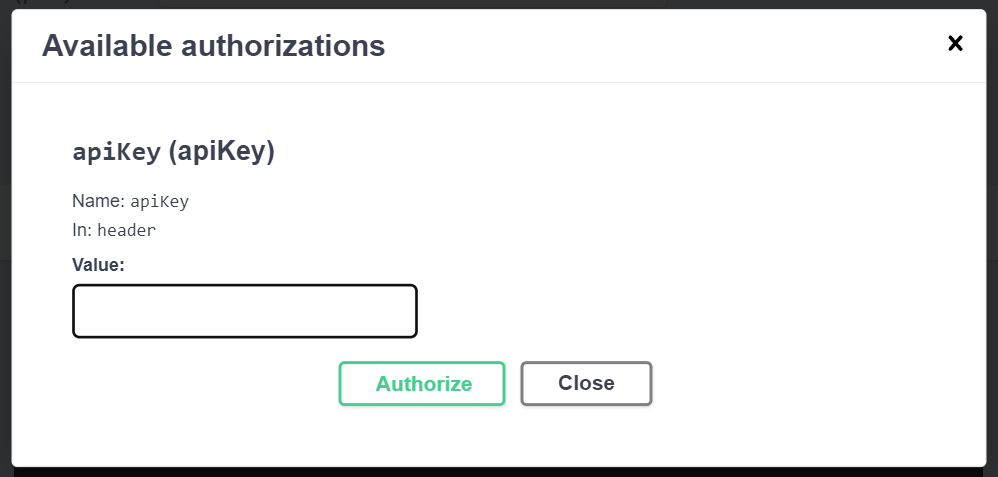
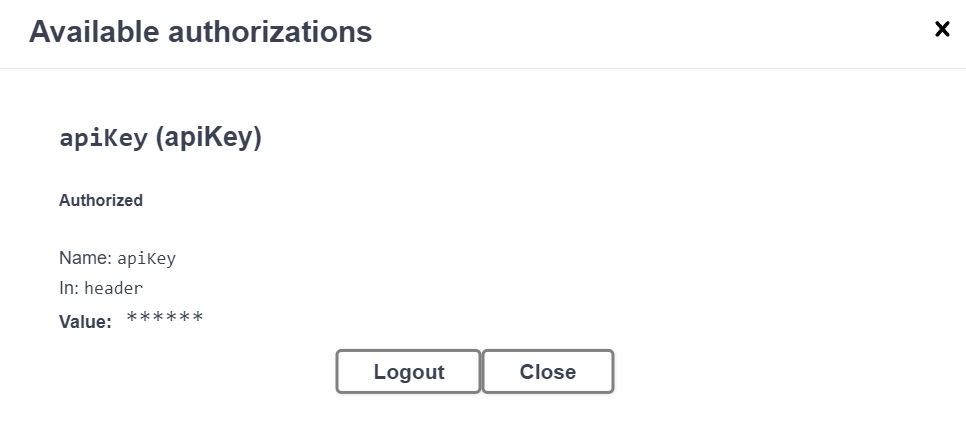
认证完成后变成这样
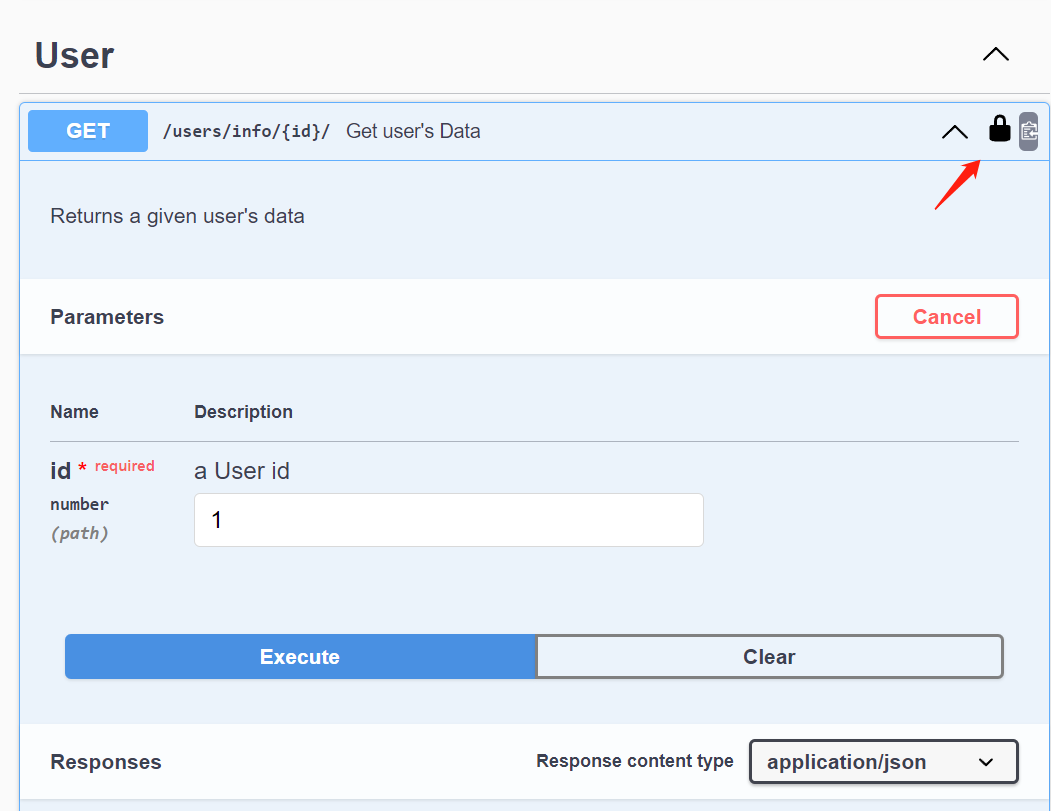
这时候再次api请求
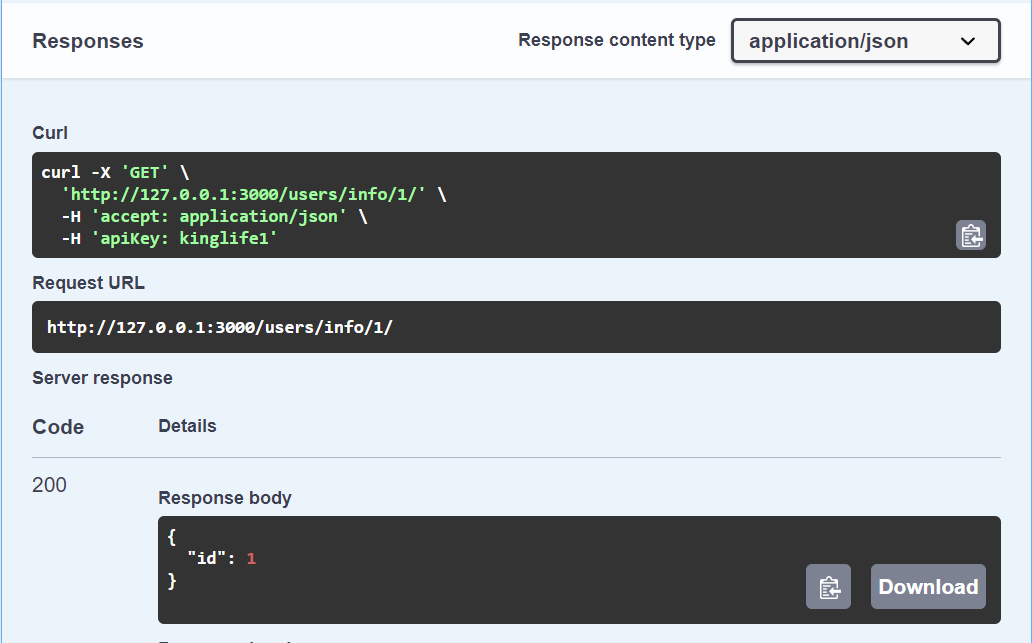
返回了正确的请求,此时大功告成
javascript客户端请求处理
这里实现客户端的认证请求处理,过度动画使用了tailwindcss框架
    var form = document.getElementById('formContact');
    form.onsubmit = function(event){
        let xhr = new XMLHttpRequest();
        var formData = new FormData(form);
        let btn = document.getElementById('btnFormSubmit');
        btn.innerHTML = `    <svg aria-hidden="true" role="status" class="inline w-4 h-4 mr-3 text-white animate-spin" viewBox="0 0 100 101" fill="none" xmlns="http://www.w3.org/2000/svg">
    <path d="M100 50.5908C100 78.2051 77.6142 100.591 50 100.591C22.3858 100.591 0 78.2051 0 50.5908C0 22.9766 22.3858 0.59082 50 0.59082C77.6142 0.59082 100 22.9766 100 50.5908ZM9.08144 50.5908C9.08144 73.1895 27.4013 91.5094 50 91.5094C72.5987 91.5094 90.9186 73.1895 90.9186 50.5908C90.9186 27.9921 72.5987 9.67226 50 9.67226C27.4013 9.67226 9.08144 27.9921 9.08144 50.5908Z" fill="#E5E7EB"/>
    <path d="M93.9676 39.0409C96.393 38.4038 97.8624 35.9116 97.0079 33.5539C95.2932 28.8227 92.871 24.3692 89.8167 20.348C85.8452 15.1192 80.8826 10.7238 75.2124 7.41289C69.5422 4.10194 63.2754 1.94025 56.7698 1.05124C51.7666 0.367541 46.6976 0.446843 41.7345 1.27873C39.2613 1.69328 37.813 4.19778 38.4501 6.62326C39.0873 9.04874 41.5694 10.4717 44.0505 10.1071C47.8511 9.54855 51.7191 9.52689 55.5402 10.0491C60.8642 10.7766 65.9928 12.5457 70.6331 15.2552C75.2735 17.9648 79.3347 21.5619 82.5849 25.841C84.9175 28.9121 86.7997 32.2913 88.1811 35.8758C89.083 38.2158 91.5421 39.6781 93.9676 39.0409Z" fill="currentColor"/>
    </svg>
    Loading...`;
        xhr.open("POST", "http://127.0.0.1:3006/messages/new/");
        xhr.setRequestHeader('ApiKey', '***************************');
        xhr.setRequestHeader("Content-Type", "application/json");
        let data = JSON.stringify(Object.fromEntries(formData));
        xhr.onreadystatechange = function() {
            if (xhr.readyState == XMLHttpRequest.DONE) {
                form.reset(); //reset form after AJAX success or do something else
                //console.log(xhr.responseText)
                btn.innerHTML = btnText;
            }
        }
        xhr.onload = () => console.log(xhr.responseText);
        xhr.send(data);
        return false;
    }