Ubuntu22.04上部署最完美的Web运行环境:LAMP + Let's Encrypt
不喜欢使用面板,占用资源且容易有安全隐患,手把手教你在Ubuntu中部署php8.1+apache+mysql最纯净运行环境
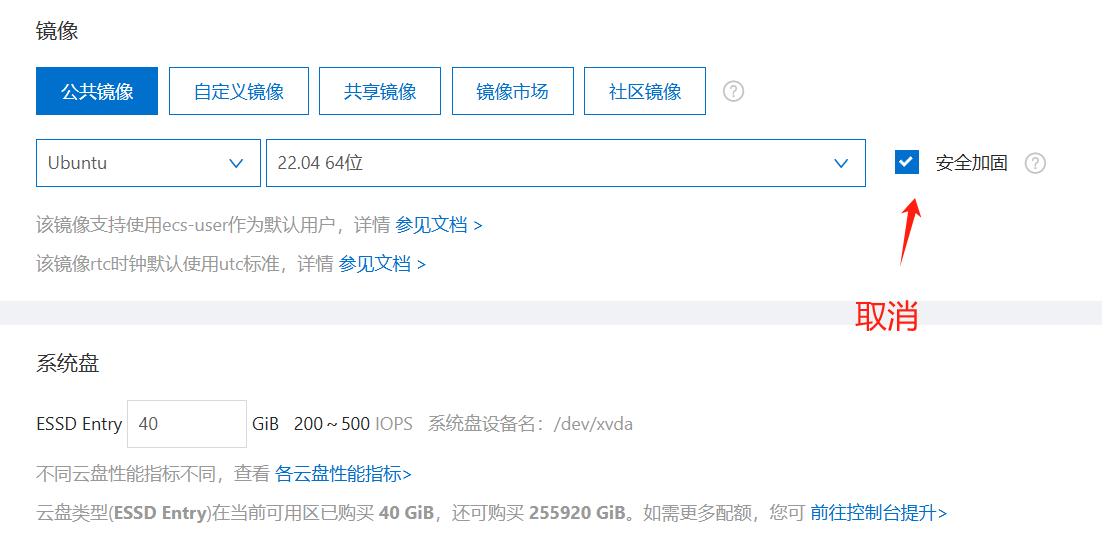
需要注意的是,如果你用的是阿里云,建议把安全加固全家桶搞掉,如果是新的ECS只需要重装系统,在选择操作系统的时候把边上的安全加固前面的勾去掉。
OK,进入正题:
一 安装Apache2
sudo apt update
sudo apt install apache2
配置防火墙
查看当前应用通行规则
sudo ufw app list
添加Apache
sudo ufw allow in "Apache"
添加ssl和openSSH
ufw allow OpenSSH
ufw allow ssh
或者用端口得方式添加
ufw allow 22
ufw allow 2222
关于防火墙的设置,在这篇文章里面有更多。
这时候在浏览器中输入服务器的公网IP应该可以看到apache的默认页。
如何在服务器端获取IP?
ip addr show ens3 | grep inet | awk '{ print $2; }' | sed 's/\/.*$//'或者
curl http://icanhazip.com
有可能出现的问题:rewrite模块没有启用:
sudo a2enmod rewrite
二 安装MySQL
sudo apt install mysql-server
安装完毕后进入配置项
mysql_secure_installation
几个配置项:
#强密码验证插件
VALIDATE PASSWORD COMPONENT can be used to test passwords
and improve security. It checks the strength of password
and allows the users to set only those passwords which are
secure enough. Would you like to setup VALIDATE PASSWORD component?

Press y|Y for Yes, any other key for No: n

Skipping password set for root as authentication with auth_socket is used by default.
If you would like to use password authentication instead, this can be done with the "ALTER_USER" command.
See https://dev.mysql.com/doc/refman/8.0/en/alter-user.html#alter-user-password-management for more information.

By default, a MySQL installation has an anonymous user,
allowing anyone to log into MySQL without having to have
a user account created for them. This is intended only for
testing, and to make the installation go a bit smoother.
You should remove them before moving into a production
environment.

#移除匿名用户
Remove anonymous users? (Press y|Y for Yes, any other key for No) : y
Success.


Normally, root should only be allowed to connect from
'localhost'. This ensures that someone cannot guess at
the root password from the network.

#禁止root远程登录
Disallow root login remotely? (Press y|Y for Yes, any other key for No) : y

 ... skipping.
By default, MySQL comes with a database named 'test' that
anyone can access. This is also intended only for testing,
and should be removed before moving into a production
environment.

#移除test是数据库
Remove test database and access to it? (Press y|Y for Yes, any other key for No) : y
 - Dropping test database...
Success.

 - Removing privileges on test database...
Success.

Reloading the privilege tables will ensure that all changes
made so far will take effect immediately.

#重新加载权限表?
Reload privilege tables now? (Press y|Y for Yes, any other key for No) : y
Success.

All done!
注意:密码验证插件用于验证强密码,根据实际情况来选择,如果选择了"y"(是),系统会要求您选择密码验证级别。请记住,如果您输入2最强级别,则在尝试设置任何不包含数字、大小写字母和特殊字符的密码时,您将收到错误消息:
There are three levels of password validation policy:

LOW    Length >= 8
MEDIUM Length >= 8, numeric, mixed case, and special characters
STRONG Length >= 8, numeric, mixed case, special characters and dictionary              file

Please enter 0 = LOW, 1 = MEDIUM and 2 = STRONG: 1
为安全期间建议禁用root远程登录,在登陆时会出错,以phpmyadmin为例:
mysqli::real_connect(): (HY000/1698): Access denied for user 'root'@'localhost'
这时候我们可以单独设置远程登录用户可以使用
CREATE USER 'pmauser'@'localhost' IDENTIFIED WITH mysql_native_password BY 'password_here';
# Mariadb
# CREATE USER pmauser@localhostIDENTIFIED BY 'password_here';

GRANT ALL PRIVILEGES ON *.* TO 'pmauser'@'localhost' WITH GRANT OPTION;
三 安装php8.1
sudo apt install php libapache2-mod-php php-mysql
查看php版本
php -v

PHP 8.1.2 (cli) (built: Mar  4 2022 18:13:46) (NTS)
Copyright (c) The PHP Group
Zend Engine v4.1.2, Copyright (c) Zend Technologies
    with Zend OPcache v8.1.2, Copyright (c), by Zend Technologies
安装常用库
sudo apt-get install -y php8.1-cli php8.1-common php8.1-mysql php8.1-zip php8.1-gd php8.1-mbstring php8.1-curl php8.1-xml php8.1-bcmath
四 配置虚拟主机
由于apache2默认会在/etc/apache2/目录中创建sites-available以及sites-enabled目录,这让虚拟主机配置变得很方便,只需要在sites-available目录下创建towait.com.conf文件
<VirtualHost *:80>
    ServerName www.towait.com
    ServerAlias www.towait.com
    DocumentRoot /mnt/www/www.towait.com/public_html
    DirectoryIndex index.html index.php
    #ErrorLog /mnt/www/www.towait.com/error.log
    #CustomLog /mnt/www/www.towait.com/requests.log combined
    <Directory /mnt/www/www.towait.com/public_html/>
        Options FollowSymLinks
        AllowOverride All
        Require all granted
    </Directory>
</VirtualHost>
这时候我们需要建立软连接,但是apache2可以用命令来实现
sudo a2ensite towait.com
这时候我们去sites-enabled目录会发现已经有了towait.com.conf的软连接。
禁用默认站点(取消软连接)
sudo a2dissite 000-default
最后检查apache2配置文件的语法
sudo apache2ctl configtest
注意:如果这里出现AH00558错误
AH00558: apache2: Could not reliably determine the server's fully qualified domain name, using xx.xx.xx.xx. Set the 'ServerName' directive globally to suppress this message
Syntax OK
这里是由于缺少全局的ServerName配置,需要打开文件vi /etc/apache2/apache2.conf,在最后一行加上
ServerName 127.0.0.1
即可解决此问题。
修改完配置一定要重启apache2让配置生效:
sudo systemctl reload apache2
除此以外值得一提的是,php的文件位置为:/etc/php/8.1/apache2/php.ini,如果要修改内存及上传文件大小等参数需要在这里修改。
五 使用Certbot为网站开启SSL并自动更新证书
sudo apt install certbot python3-certbot-apache
如果安装完成使用certbot --apache来给网站安装证书,如果出错:
certbot cannot import name 'appengine' from 'urllib3.contrib'
Traceback (most recent call last):
  File "/usr/lib/python3/dist-packages/requests_toolbelt/_compat.py", line 48, in <module>
    from requests.packages.urllib3.contrib import appengine as gaecontrib
ImportError: cannot import name 'appengine' from 'requests.packages.urllib3.contrib' (/usr/local/lib/python3.10/dist-packages/urllib3/contrib/__init__.py)
需要卸载urllib3
pip3 uninstall urllib3
最后安装任务给证书自动续期
sudo systemctl status certbot.timer
或者
crontab -e

0  0,12 *  *  * certbot renew --post-hook "systemctl reload apache2"
测试
sudo certbot renew --dry-run
常见问题
1.apache2服务自动停止
出现错误:
Avoiding the OOM Killer by limiting the number of Apache2 processes and clients
修改mpm_prefork_module相关参数,修改响应数值,文件位于 /etc/apache2/mods-available/mpm_prefork.conf
<IfModule mpm_prefork_module>
	StartServers			 5
	MinSpareServers		  5
	MaxSpareServers		 10
	MaxRequestWorkers	  100
	MaxConnectionsPerChild   3000
</IfModule>
相关参数说明:
StartServers: apache 自动启动的服务器进程数(如我们运行ps aux或时看到的)。MinSpareServers:apache 将保留运行的最小服务器进程数,以便可以根据需要使用它们。MaxSpareServers:apache 将保留运行的最大服务器进程数。任何超过此数量的进程都将被终止。MaxClients:可以同时处理的最大请求数(GET、POST 等)。本文件前面的 MaxKeepAliveRequests 确定每个连接在重新建立之前可以发出多少个请求。虽然保持这些数字较高对最终用户的性能有好处,但如果您有像我这样的小型服务器,那就不好了。MaxRequestsPerChild:子进程在终止之前将处理的请求数。
2.关于目录权限的安全设置
更改 /mnt/www/www.xxx.com/public_html/ 项目目录及其所有子目录和文件的所有者和所属组。
chown -R www-data:www-data /mnt/www/www.xxx.com/public_html/
3.AH00558错误
使用apache2ctl configtest出错,这是一个警告错误,非语法错误
AH00558: apache2: Could not reliably determine the server's fully qualified domain name, using 172.17.38.76. Set the 'ServerName' directive globally to suppress this message
对于强迫症患者来说肯定需要消灭这样的提示的,修改 /etc/apache2/apache2.conf,找到最后一行添加
ServerName 127.0.0.1
即可。