第一次上手CML变色龙
这篇内容包含了变色龙(Chameleon)的安装和组件的引入,还是非常简单的。官网文档都有,这里只是简单整理一下。
安装 chameleon-tool
依赖环境:node >= 8.10.0、npm >= 5.6.0
npm i -g chameleon-tool
安装成功后,执行 cml -v 查看当前版本, cml -h 查看帮助文档
创建项目与启动
- 执行
cml init project - 输入项目名称
- 等待自动执行
npm install依赖 - 切换到项目根目录执行
cml dev
注意:在这一步我出现了warning错误,其实无视它就是,不影响项目的运行
目录与文件结构
生成的目录结构如下,详细介绍参见目录结构。
├── chameleon.config.js                 // 项目的配置文件
├── dist                                // 打包产出目录
  ├── alipay                            // 支付宝小程序代码
  ├── baidu                             // 百度小程序代码
  ├── wx                                // 微信小程序代码
  ├── tt                                // 头条小程序代码
  ├── qq                                // QQ小程序代码
  ├── xx                                // 其他终端
├── mock                                // 模拟数据目录
├── node_modules                        // npm包依赖
├── package.json
└── src                                 // 项目源代码
    ├── app                             // app启动入口
    ├── components                      // 组件文件夹
    ├── pages                           // 页面文件夹
    ├── router.config.json              // 路由配置
    └── store                           // 全局状态管理
第一个项目和组件
修改文件 src/pages/index/index.cml
<template>
  <view>
    <!-- 数据绑定与计算属性 -->
    <text>{{ message }}</text>
    <text class="class1">{{ message2 }}</text>

    <!-- 条件与循环渲染 -->
    <view c-if="{{showlist}}">
      <view c-for="{{array}}" c-for-index="idx" c-for-item="itemName" c-key="city">
        <text> {{ idx }}: {{ itemName.city }}</text>
      </view>
    </view>

    <!-- 事件绑定 -->
    <view c-bind:tap="changeShow"><text>切换展示</text></view>
  </view>
</template>

<script>
class Index {
  data = {
    message: 'HelloCML',
    array: [
      {
        city: '北京',
      },
      {
        city: '上海',
      },
      {
        city: '广州',
      },
    ],
    showlist: true,
  };

  computed = {
    message2: function() {
      return 'computed' + this.message;
    },
  };

  watch = {
    showlist(newVal, oldVal) {
      console.log(`showlist changed:` + newVal);
    },
  };

  methods = {
    changeShow() {
      this.showlist = !this.showlist;
    },
  };

  created() {
    console.log('生命周期');
  }
}

export default new Index();
</script>
<style scoped>
.class1 {
  color: #f00;
}
</style>
<script cml-type="json">
{
}
</script>
接着创建一个页面和组件
cml init page
然后输入名称first-page,回车即可生成出文件 src/pages/first-page/first-page.cml
在组件中输入以下内容
<template>
  <view>
    <text class="first-com-text">我是组件first-com</text>
  </view>
</template>
<script>
class FirstCom {}
export default new FirstCom();
</script>
<style scoped>
.first-com-text {
  color: #0f0;
}
</style>
<script cml-type="json">
{
}
</script>然后在刚才的src/pages/index/index.cml中引用first-com
<script cml-type="json">
{
  "base": {
    "usingComponents": {
      "first-com": "components/first-com/first-com"
    }
  }
}
</script>
template 中使用 first-com 组件
<template>
  <view>
    <first-com></first-com>
  </view>
</template>最终的src/pages/index/index.cml
<template>
  <view>
    <!-- 数据绑定与计算属性 -->
    <text>{{ message }}</text>
    <text class="class1">{{ message2 }}</text>

    <!-- 条件与循环渲染 -->
    <view c-if="{{showlist}}">
      <view c-for="{{array}}" c-for-index="idx" c-for-item="itemName" c-key="city">
        <text> {{ idx }}: {{ itemName.city }}</text>
      </view>
    </view>

    <!-- 事件绑定 -->
    <view c-bind:tap="changeShow"><text>切换展示</text></view>

    <!-- 引入第一个组件 /src/components/first-com/first-com.cml -->
    <first-com></first-com>

  </view>


</template>

<script>
class Index {
  data = {
    message: 'HelloCML',
    array: [
      {
        city: '北京',
      },
      {
        city: '上海',
      },
      {
        city: '广州',
      },
    ],
    showlist: true,
  };

  computed = {
    message2: function() {
      return 'computed' + this.message;
    },
  };

  watch = {
    showlist(newVal, oldVal) {
      console.log(`showlist changed:` + newVal);
    },
  };

  methods = {
    changeShow() {
      this.showlist = !this.showlist;
    },
  };

  created() {
    console.log('生命周期');
  }
}

export default new Index();
</script>
<style scoped>
.class1 {
  color: #f00;
}
</style>
<!-- 引入第一个组件 /src/components/first-com/first-com.cml -->
<script cml-type="json">
{
  "base": {
    "usingComponents": {
      "first-com": "components/first-com/first-com"
    }
  }
}
</script>
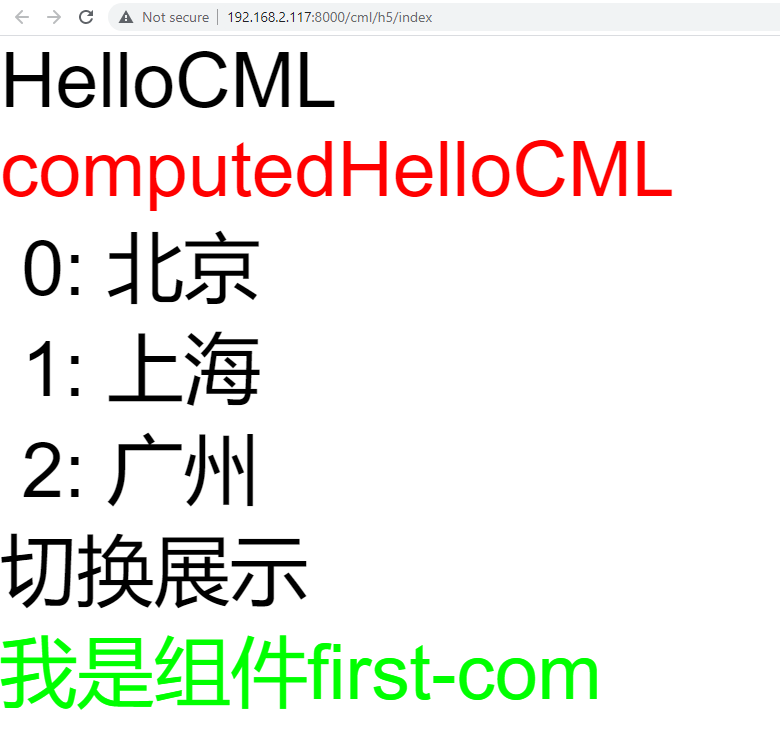
运行效果
